Overview

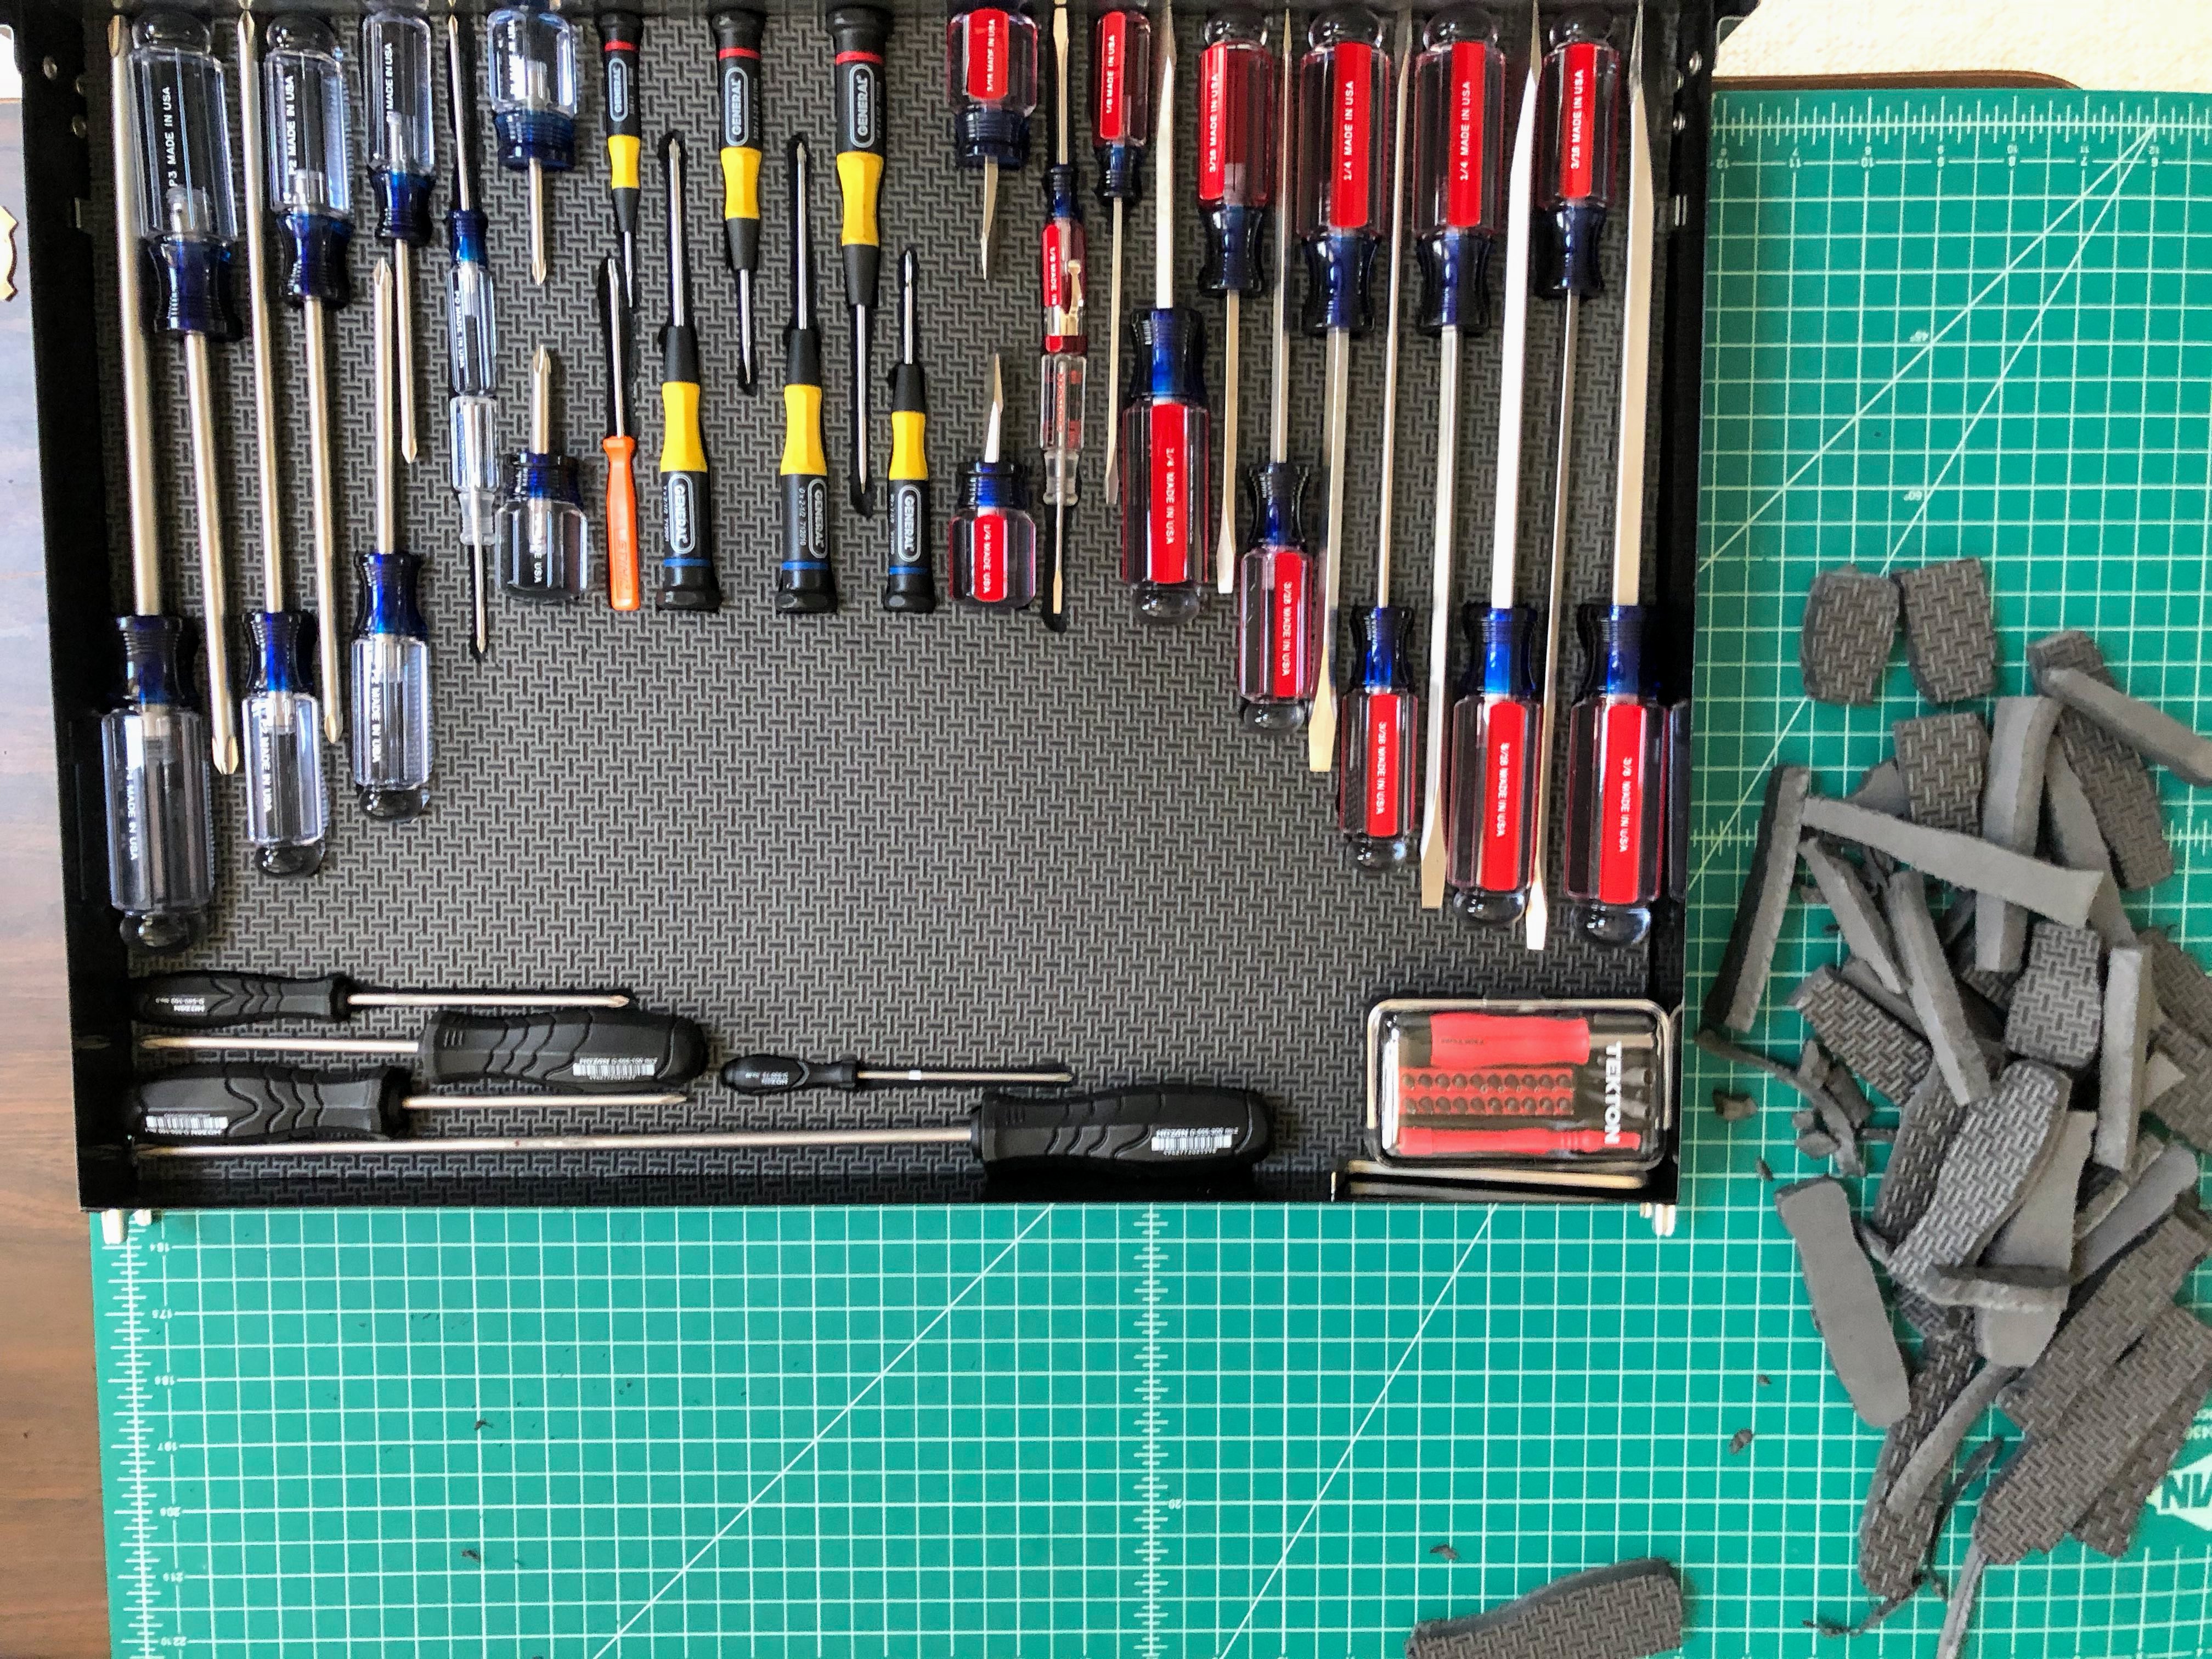
This guide goes through the steps we used to make custom foam inserts to organize our tools. As you have probably found, there are many ways to organize tool drawers. Our biggest aim for our organization method was efficient and easily accessible tool storage - we hoped that this priority of function would lead to visibly pleasant presentation. When searching for a solution, the biggest issue that we found was the inefficient use of space - with 3 tool chests overflowing with tools, space is limited. We also wanted the solution to provide easy visibility of missing tools. Just as a surgeon does a tool/sponge/etc. count before and after a surgery to insure that nothing is left behind, we wanted to be able to easily check that no tools had been left behind in the engine bay or other part of the car.

The above requirements quickly pushed us towards a custom cut foam insert solution. Pre-cut foam inserts were quickly ruled out due to the specialty and miscellaneous tools that are not easily found on pre-cut inserts, but also that most of these inserts are incredibly inefficient (for example, the Kobalt Tools inserts). The next option we came across was Kaizen foam. Although it provides much the same function as our final solution, we were not impressed with it feel and look. The Kaizen foam seems easier to work with, but that also made us think that it would more easily become deformed from extended use. Our solution was to use EVA Foam - the foam tiles that are commonly used for flooring tiles.

After using these foam inserts for years, we have been extremely pleased with their function. The foam has maintained it's shape and has been excellent for our tool storage needs. With this foam we have had no problems with having small strips of foam between tools. One thing to realize is that we made the assumption that a majority of the tools in the drawer would remain in the drawer at any single time - meaning the tools them selves help to provide the rigidness to the foam's structure. It would be nice to add labels to foam for each tool, but for the most part we know our tools, so this was just not worth the space.


Products Used

Tools

Quantity

Link

Hot Knife 1 Amazon
2 ft Square Amazon
7 inch Square Amazon
Sharpie Ultra Fine Point Markers 2 Amazon
Cutting Mat - 48 x 36 inch Amazon

Materials

EVA Foam Tiles 3 Amazon

1Alternatively, you could try using a utility knife, like the red dot knife. However, cutting with this or a general utility knife, took a lot longer to gut through the foam.

2 We just used a Sharpie fine point marker to outline the tools, but we came across a suggestion to try a long nosed fine tip marker. We haven't had a chance to try it, but seems like it could offer a more precise trace of each tool.

3 We especially like this specific pattern of EVA foam.

Procedure Used


1. First, we removed the tool drawer from the tool chest. We laid out all of the tools and items in the desired locations. We were especially mindful not to have small strips of foam that would not hold up over time. We found it ok to put tools right up against one another.
2. Next, we setup a good workspace where we could sit while cutting the EVA foam. We found quite useful to use a large cutting mat to prevent ruining the knife blade or table. We also turned on the hot knife and allowed it to heat for about 5 minutes before using it.
3. To start making the drawer insert, we first used the hot knife to cut the EVA foam to the correct width. When making these cuts, we used the 2 ft square to guide the hot knife. This helped to create straight lines. Be sure not to keep the hot knife in one spot for too long, or else it will burn the foam.
4. Using the same cutting technique as the previous step, we made a cut perpendicular to the sides - this edge will be at the front of the drawer.
5. Subsequently, we inserted the cut EVA foam into the drawer and pushed it towards the front. At this point, the foam was sticking out the back. We used a Sharpie fine point marker to mark the length and then cut - again, using the same methodology. We tried to insure that the foam was tight in the drawer, but not too tight that it popped up in the middle.

6. With the EVA foam now cut to fit the drawer, moved to tracing each of the tools. We started by tracing the tools that line the edges of the drawer and work our way inwards. To trace the tool, we placed either a single tool, or group of tools, on the foam and traced the tool with a Sharpie fine point marker (or the long nosed fine tip marker). Beware not to over do the marks since you don't want them to visible after the cut. Only trace the parts that you want to cut; for example, for a screw driver, we only cut the handle of the screwdriver, since the shaft of the screwdriver then rests on top of the EVA foam.

At this point, we only traced out a couple of tools. We did this because the exact fit and position of each tool will vary slightly as the foam is cut and the tool inserted. We actually found that we could position tools "tighter" together as we went along.

NOTE: if you are concerned that the trace marks will be seen after cutting, you can trace the tool on the reverse side of the foam (the side that will be hidden). However, the tool layout must now be a "reflection" of the desired layout, so keep track of the orientation when using this method.

7. Insuring that the hot knife was heated, we began to cut out the first tool. Be sure to error on cutting too little rather than too much - it is easier to cut more later than having to start over. While cutting, we paid special attention to keep the hot knife straight up and down. At each corner/change in direction, we kept the hot knife's cutting edge straight up and down so that the cut is uniform throughout the depth of the foam.
8. Next, we pushed out the cut piece of EVA foam, and test fit the tool. If the tool was too snug or did not fit correctly, we used the hot knife to make any adjustments to the cut out.
9. While leaving the first tool(s) in their respective cut out(s), we placed the next tool(s) beside them. Using the Sharpie fine point marker, we traced the tool(s) onto the EVA foam.
10. We repeated Step 6. through Step 9., working from the tools located on the outside edges of the drawer and working inward. You should anticipate needing to make slight adaptations to the layout as the the tools are cut into place.
11. With all of the tools now cut into the EVA foam, we placed the foam into the drawer and filled with tools.
12. Optionally, you could glue some type of backing to the EVA foam such that the foam does not lose it's shape when a tool is in use. Although we have not tried it yet, we would simply spray some extra strong spray adhesive to the back of the EVA foam and attach a backing, like this green tool drawer liner or maybe poster board.